Tag: pasta

Pastaschelpen in de oven met spinazie, pesto en vegan kaassaus

Pastaschelpen in de oven met spinazie, pesto en vegan kaassaus

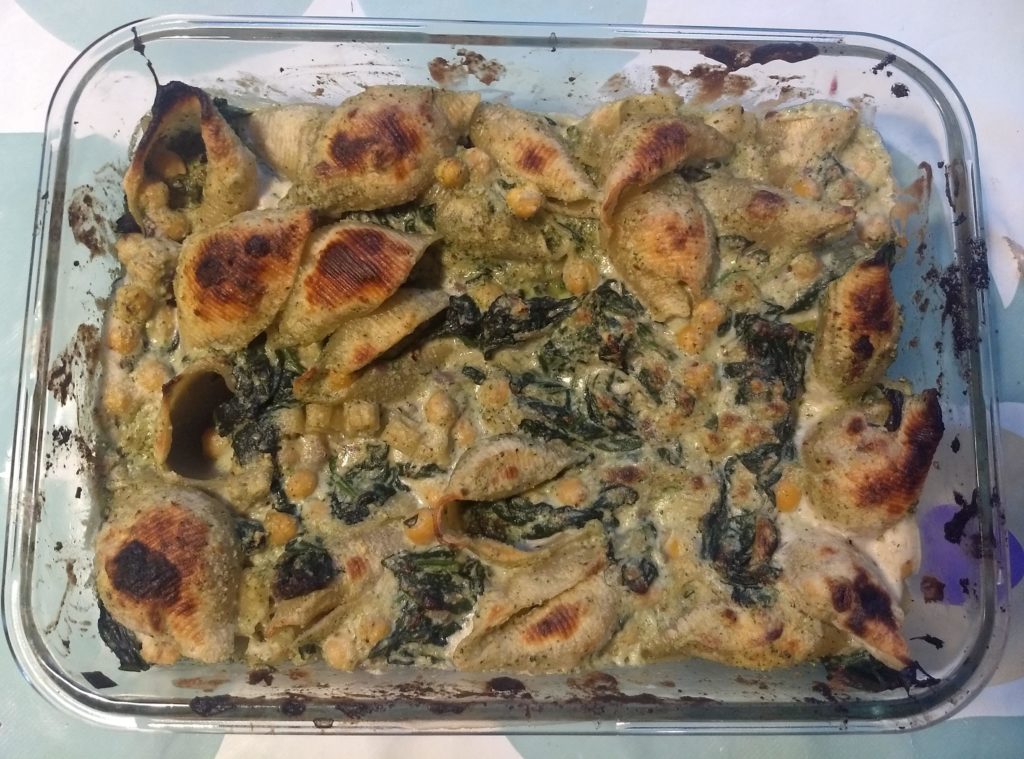
Pastaschelpen. Gekocht in een ander tijdperk en terug tegengekomen toen we in de strijd tegen een plaag meelmotten eindelijk alle zakjes droge bonen, rijst, en pasta die zich hadden verzameld in de keukenkasten in mooie, doorzichtige en vooral hermetisch afsluitbare potten staken. Alleen pakken zo’n schelpen best veel plaats in in die potten, en zijn er niet zo gek veel recepten om pastaschelpen te verwerken. Dus toen er in één van de Donderdag Veggiedag-nieuwsbrieven van EVA vzw een ovenschotel met pastaschelpen, spinazie, pesto en vegan bechamelsaus besloot ik om dat meteen te proberen!

Ik heb het recept lichtjes aangepast: de pesto maakte ik van radijsjesloof en pijnboompitten omdat ik dat allebei in huis had, en maar een beetje basilicum (dat loof-idee kwam ook van een EVA recept). Je kan het dus ook prima met basilicum of peterselie doen. De saus maakte ik met cashewnoten om het smeuïger te maken, ze zorgen er ook voor dat je saus minder ‘opgaat’ in de rest van het gerecht. Ik vulde ons restje pastaschelpen aan met wat diertjespasta voor de kinderen (die uiteraard vervolgens alleen de schelpen wilden) en gebruikte 400 gram spinazie ipv 200, omdat dat nu eenmaal de inhoud van een zak uit de winkel is en die anders blijft verleppen in de koelkast.

Ingrediënten voor een grote ovenschotel, 4-6 personen

– 300 gram pastaschelpen of andere vormpasta zoals penne, strikjes…
– 200-400 gram spinazie of andere bladgroente
– olijfolie
– 1 ui
– 1 teentje look
– een blik kikkererwten (400 gram)
voor de pesto:
– loof van een bussel radijzen, plus wat peterselie of basilicum (wat je in huis hebt)
– 1 teentje look
– 4 soeplepels pijnboompitten of blanke amandelen
– 100 ml olijfolie
– peper en zout
voor de kaassaus:
– 100 gram cashewnoten, 4-5 uur geweekt of 10 minuten gekookt in water en uitgelekt
– 300 ml ongezoete plantaardige melk (bv. amandel of haver)
– 2 tl maïzena
– 1 teen knoflook, gesnipperd of geperst
– 1 tl uienpoeder
– 1 eetlepel gistvlokken
– peper, zout en muskaatnoot
– optioneel: vegan gemalen kaas of Parmezaan

Benodigdheden: een grote (steel)pan met dikke bodem, een kleinere steelpan, een keukenrobot, een grote ovenschaal van 26 x 26 of 30 x 22

Bereiding:

Kook de pastaschelpen al dente. Verwarm wat olijfolie in de steelpan, pel en snipper de ui en fruit in de olie tot hij glazig is. Plet en snipper de knoflook en voeg hem erbij. Voeg de spinazie erbij, zet het deksel erop en bak mee tot hij geslonken is.

Verwarm de oven voor op 180 °C.

Breng voor de kaassaus 150 ml melk aan de kook in de steelpan. Meng intussen de maïzena met 50 ml melk. Als de melk begint te koken, voeg je de maïzena en de knoflook, het uienpoeder en de gistvlokken toe. Laat nog 1 minuut doorkoken. Doe de uitgelekte cashewnoten in de keukenrobot met de rest van de melk en pureer tot een gladde pasta. Voeg bij de melksaus. Voeg eventueel een handje gemalen kaas toe. Breng flink op smaak met zout, peper en muskaatnoot.

Voor de pesto doe je de knoflook, pijnboompitten en loof/kruiden in de keukenrobot en maal ze fijn. Voeg de olijfolie geleidelijk toe tot je een smeuïge pesto hebt. Breng op smaak met zout.

Doe de pasta in de ovenschaal en meng de gebakken spinazie en kikkererwten eronder. Schep de pesto en kaassaus erover, zet in de oven en bak het gerecht 15 minuten. Eventueel kan je op het einde de grill nog even opzetten voor een lekker korstje.


What to eat when you’re eating in Italy (1)

Soo, I haven’t been here for a while! My vacation in Italy would be responsible for that. We (that would be, my lovely partner-in-crime and I) toured Italy by train from north (Torino/Turin) to south (Taranto) and back up again, passing by Ravenna. What can I say… I was in culinary heaven for two weeks. So I’m eager to share my newly discovered not-so-secret addresses with you, for those who ever pass by in one of the Italian cities we visited. Some of them were gastronomically advanced, some were very simple fishermen’s restaurants and in some we got really rude treatment from the waiter. But all were great in their own way. Here we go!

Our first stop was Turin, home of the slow food movement. During the day, we encountered a fantastic supermarket-meets-restaurant/coffee bar place called Eataly (apparently it’s a chain in Italy). You can buy some great quality groceries here (pasta, coffee, fresh vegetables…), have lunch downstairs, sip some coffee upstairs… I fell in love with the place at once. We had dinner at L’Oca Fola (the crazy goose). We found this restaurant, which happened to be very near our hotel, through a slow food-guide. We went for a complete dinner menu, which was a little more than we could handle… We tasted some very typical Turin dishes like risotto and gnocchi with heavy cheese sauce, accompanied by local Barbera wine. Breadsticks, which were invented in Turin, were also omnipresent. Let’s say the menu was a bit on the heavy side and reminded us of food you’d want to eat if you were about to go do heavy work all day. We definitely shouldn’t have tried eating all the dishes that kept coming at us, and the free grappa at the end of the meal was very welcome to help digestion! The food was good, but not especially refined. If you’re in Turin for just one day, I’d recommend looking at one of the restaurants more towards the city center, but L’Oca Fola is great to try if you’re there for several days.

Eataly, the fabulous supermarket in Turin

Next, we moved on to Perugia, a cosy little city with a very medieval feel and lots of stairs and elevation (they even have a public elevator in the middle of town!). During the day we came across a restaurant/wine bar called Énonè and decided to try it for the night. It was fantastic. We tried some local cheese with honey and preserved figs as an appetizer. As a first course, we had pasta – simple ravioli in tomato sauce and spaghetti with scampi. My main course was something called ‘Grand Vegetarian’ – a simple collection of grilled vegetables such as tomatoes, zucchini, eggplant which was absolutely delicious. The dessert was something scrumptious with mascarpone and amaretto cookies with grand marnier. As we were sitting at the table chatting away after the meal, the owner brought over some bitter liquor to taste. Needless to say, I’d recommend this restaurant to anyone going to Perugia and we’d absolutely go there again! Another thing to try in Perugia is Sandri, a bar that’s been there for several decennia and looks exactly that way. The waiters wear those traditional uniforms and they have a bar filled with sweets and pastries… It’s great to just sit on their terrace, which is in Perugia’s main street, sipping from a cappuccino, nibbling on some sugary piece of pastry and watching people pass by. Or sipping a bellini cocktail and having some rice ice cream, or downing an espresso with a piece of chocolate pie… You get the point.

Scenic view at Perugia

We went on to Orvieto, where we had a nice but not especially remarkable dinner at Mammaurelia, with some very good wine. We followed the Lonely Planet guidebook to an ice cream parlor called Pasqualetti and had some delicious gelato there with a view on the impressive cathedral. We also took the underground Orvieto-tour, which went past the underground colombaria or dovecotes. These were basements of peoples’ houses carved out to accomodate doves, which were then caught and prepared as a lovely dinner!

The impressive cathedral of Orvieto, barely fitting into the picture

Dovecotes dug in people's cellars at Orvieto

We went on to see and eat at Napels, Salerno and more… will be featured in the next post!

Italian-style dinner

The sun is shining! Finally! As usual, my mood turns completely must-have-some-Italian-style-sun-ripened-food at the sight of the first shiny rays of sun. As one of  my classes was moved, I had some time to cook a more elaborate dinner tonight, which I did! Healthy (veggies!), Italian (eggplant!), vegetarian… All you need is a lovely glass of wine to enjoy it with!

It was my first time making artichokes that didn’t come out of a can. I love artichokes, but frankly, I’ve always been a bit intimidated by them. They appear so… rugged. So today, as I got off the bus and towards the grocer’s, I overcame my fear and bought some, remembering I had a step-by-step recipe from delicious. magazine. What doesn’t kill you, makes you stronger, right? They require a little work but it’s really worth it, and not that hard at all!

The second dish is a classic eggplant-tomato-pasta. I’m a big eggplant fan and so I tried this recipe, which came out of ‘Una Bella Spaghettata’ – a book about Neapolitan pasta I’ve had for quite some time but haven’t really used so far. I changed some things (you’re supposed to add in a lot of mozzarella but I left that out) and it came out exactly as it shoud – a tasty, light Italian pasta dish. Give it a try!

Stuffed artichokes

Ingredients:

4-5 artichokes (depending on size)
half a lemon
50 grams of panko (Japanese breadcrumbs, some ground dry old white bread will work too)
50 grams of parmezan cheese, (freshly) grated
2 eggs
handful of basil, torn into small pieces
1 big tablespoon of capers

Place a pan of salted water on the fire. First, you have to ‘clean’ the artichokes. This is not as hard as it seems, but you need a good sharp knife (preferably a bigger chef knife). Start by cutting off the upper side of the artichoke, more or less at the widest part, cutting off a good part of the upper artichoke. Then, cut off the stem, including the base and cutting off the outer hard leaves. Now, take a spoon with sharp edges and remove the inner parts of the top, you will notice that this is a bit ‘hay’-ish. Keep trimming the leaves and taking out the dry inner part until you have a shape that’s somewhat like a ‘finger bowl’ with all smooth sides, then quickly brush the sides with a half lemon to prevent it from oxidizing. Repeat this with all the artichokes (you will notice, it gets easier as you get more practice) and then but them into the (by now boiling) water. Cook them for about 15 minutes, until they’re al dente but not completely soft (they will continue in the oven later).

Meanwhile, preheat the oven to 180 degrees and prepare the stuffing by mixing all the other ingredients. When the artichokes are out of the water, let them cool down slightly, place them on a baking tin with parchment paper and then fill them up with the stuffing, mimicking the ‘artichoke/pyramid shape’. Now, place them in the oven and bake for 20 minutes, until the tops turn golden brown (I turned the temperature up a bit at the end and turned the grill on to reach this effect). Before serving, you may need to remove some extra outer leaves that have become hard in the oven. Enjoy!

Eggplant tomato pasta

Ingredients for 4 servings:

2 eggplants
salt
olive oil
4-6 tasty tomatoes, depending on size, chopped (I used a mixture of more fleshy tomatoes and yummy cherry tomatoes)
2 cloves of garlic, peeled and chopped
400 grams of good quality pasta, rigatoni or penne or another shape that will soak up the tomato sauce well
80 grams of Parmezan cheese, freshly grated
a handful of fresh basil
Cut the eggplant into thick slices (about 1,5 cm), sprinkle with salt on both sides and let them sit in a colander for at least 30 minutes. (Note: I love eggplant, but it took me a long time to figure out how to make it the best way. You really need to do the salting beforehand, because the eggplant will lose some water in the process and soak up less oil later. I also find that it becomes rubbery if you don’t do this. You can then either let it fry quickly in hot oil until the sides are becoming brown, or let it simmer quietly – my preferred style, when it starts falling apart and mixing itself into the sauce… yum! Anyway, back to the recipe.) Then, squeeze as much liquid out of the slices as possible, and pat with paper towels. Heat a generous amount of olive oil in a large heavy-bottom skillet, let it get really hot and then add the eggplant. Fry, turning until its sides are golden brown. Take the slices out of the skillet and put on paper towels to drain.Leave a few tablespoons in the skillet and reduce the heat.

In the meantime, cook the pasta as directed in salted water. When done, drain and then put the pasta back into the pan. Now, add the garlic to the skillet and let it fry a bit. Then, add the tomatoes to the skillet (I tend to add a little white wine here for the sauce, but this is optional of course). Let the tomatoes heat and simmer, when they’re starting to fall apart add the eggplant back into the sauce and let it simmer on a low fire for a while, until the eggplant starts to fall apart and you have a consistent sauce. Add salt and pepper to taste. Turn the fire really low and add in the pasta and parmezan cheese, turning over and under until all the pasta is sufficiently mixed with the sauce. Sprinkle with basil leaves and serve!


Vegetable lasagna

Spring has come around, so I’m getting excited for delicious sun-ripened vegetables! Seems like the perfect moment to post this vegetable lasagna, which I found as an external post on Jamie Oliver’s website and then tweaked it a bit. Basically, this is a really rich (but healthy!) lasagna using 4 different vegetables. It takes a while to make this lasagna (about two hours), but it’s really worth the wait. It’s a vegetarian-safe dish but I’ve served it to several carnivores and they all agreed, it doesn’t need meat at all!

This amount is good for 5-6 servings.

Ingredients:

2 large eggplants, cut into 1 cm-thick slices
2 medium zucchini, cut into 1 cm-thick slices
3 red or yellow peppers
9 sheets of lasagna (depending on the size of your baking pan, you need 3 layers of lasagna)
250-300 grams of ricotta cheese
400 grams of fresh mozzarella cheese, cut into small cubes or slices
150 grams of grated parmesan cheese
2 egg yolks
a handful of basil, leaves torn
a handful of chopped parsley leaves
500 ml of good tomato sauce or your own fresh tomato sauce (fry some oil with garlic, add tomatoes, perhaps a bit of white wine or extra passata and let it simmer for a while, season to taste with Italian herbs and salt and pepper)

Get cooking:

Heat the grill/broiler function on the oven. Lay the eggplant slices in a colander and sprinkle on both sides with salt, let them stand for about half an hour and  then squeeze as much liquid out of them as possible, then pat dry with paper towels. Lay them on a wire rack, brush both sides slightly with oil, sprinkle with pepper and salt and grill them on both sides until tinted (not brown) and soft. If your oven is small, you may need to repeat this a few times.

While the oven is hot and you’re waiting for the eggplant, you can start with the peppers. Cut the peppers into large flat pieces (two or three parts per pepper) and remove the seeds and inner parts. Lay them on a wire rack and grill until they have black ‘boils’, then put them in a plastic freezer bag and let them steam so the skin will come off more easily. Peel off the skin when cooled (watch out, they’re hot). If you have a really thin peeler, you can try peeling the skin off this way.

Steam the zucchini slices for a few minutes until tender but with enough bite left. The way I do this is by putting a ‘pasta colander pan’ into a fitting pan with a little bit of boiling water on the bottom. You can also use a steamer if you have one, or just add a little bit of boiling water in a regular pan and blanch the zucchini shortly.

Cook the lasagna sheets shortly in salted water if this is indicated on the package and let it drain (the best quality Italian lasagna has to be cooked beforehand).

Preheat the oven to 180 degrees Celsuis (about 350 Fahrenheit). Mix the ricotta, mozzarella and half of the parmezan with the fresh herbs, season to taste with salt and pepper.

Brush the sides of a 25 x 25 cm baking pan (or one about the same size, around 625 square cm) with olive oil and add about 1/4 of the tomato sauce. Arrange the eggplant slices on top of this layer.

Now add 1/3 of the cheese mixture and top with lasagna sheets.

Add another layer of tomato sauce.

Now top with the zucchini slices.

Repeat with the cheese and the pasta. Add another layer of tomato sauce.

Now top with the peppers.

Repeat the process again, using up all the cheese mixture. Top the last lasagna with the remaining tomato sauce and sprinkle with parmesan cheese.

Top the baking pan with tin foil to prevent burning. Put the dish into the oven and let it bake for 55 minutes, then remove the tin foil and let it bake for 5 more minutes. Take it out of the oven, let it cool for a little bit and enjoy!

Ravioli with ricotta and tomato sauce

We all love Italian pasta, right? It’s so light, full of flavor, simple, addictive, and to me it’s still one of the cuisines that pulls off vegetarian food most effortlessly and naturally. This recipe from delicious. magazine has become one of my personal favorites. It’s not difficult to make, but filling the ravioli will take some time (it’s very much worth it though!). I started out with my ravioli stamp but soon switched to making cut-outs by hand, because this is faster. There’s only one piece of equipment you really need and that’s a pasta machine. It’s possible to roll out the pasta by hand, but it will never be as fine as the machine-made.

Ingredients for 4 people:

for the pasta:
400 grams of ‘tipo 00’ flour (gran duro: it’s also possible to use regular flour but this kind is better for pasta, you can find it at Italian supermarkets)
4 eggs

for the filling:

250 grams of ricotta
the grated zest of one organic lemon (or at least a non-chemically-treated lemon)
a pinch of sugar
a pinch of salt
freshly ground pepper

for the sauce:

olive oil
2 shallots, chopped
garlic clove, chopped
one can of whole peeled tomatoes (or canned cherry tomatoes)
a dash of white wine
small can of tomato passata
note: I made this in February, and I try not to use fresh tomatoes in Winter since they’re just not tasty. If you’re making this in Summer, please use real sun-ripened ones!

topping:

chopped flatleaf parsley
grated parmesan cheese

How to:

Start with the pasta. Put the flour in a bowl, make a cup and add the eggs. Mix with a fork and then with your hands until you have a coarse dough. Take it out of the bowl and knead the dough for at least 10 minutes, until it becomes smooth and elastic (when I get tired I try to see this as a good work out). Wrap it in plastic foil and let it sit for at least 30 minutes.

Make the filling by mixing all the ingredients.

Make the sauce at least 20 minutes before serving, to give it time to simmer. Heat the olive oil in a sturdy saucepan and fry the onion and garlic until soft. Add the canned or fresh tomatoes. Heat the tomatoes and add some white wine. Let this simmer for a while and add the passata. Season to taste with salt and pepper. Let it simmer on a low fire until you have a tasty sauce. At this point, I ‘cheated’ and added a bit of leftover Barilla pasta sauce that I had in the fridge. Of course, you’re free to use your own preferred tomato sauce recipe, but simplicity is key.

Assemble the ravioli while the sauce is simmering. Fill a large saucepan with water, add a pinch of salt and bring to a boil while making the ravioli (one of those pans with an extra ‘colander’ piece is ideal, because you can make several batches of pasta without refreshing the water each time, but a slotted spoon or pasta spoon works fine too). Roll out the pasta with a machine (or by hand), start with a third of the pasta dough. Position the machine at its widest and turn the dough through, fold double and repeat. Keep making the sizes smaller and rolling the dough through twice until you’re at the finest position. Make equal squares or rectangles of the rolled-out dough. I made 5×7 cm, but smaller will work as well. Put a teaspoon of filling on half of the rectangles, then cover with a second rectangle and press carefully, excluding as much air as possible. Finish the edges by impressing them with a fork. Repeat for all of the dough. Boil the ravioli in batches for 3-5 minutes (until they come floating on top) and take them out of the water. Add the pasta to the tomato sauce and mix carefully. Arrange on a plate and top with parsley and parmesan. Enjoy!